The Problem
My trusty Synology RAID controller decided it was time to retire, leaving me with a storage dilemma. After researching replacement options, I discovered something interesting: an Ebay listing for a NetApp DS4246 4U JBOD with 24 bays, rails, and controller was actually cheaper than fixing my existing setup. Sometimes the storage gods smile upon us.
The Plan
Here's what I'm working with:
- Hardware: NetApp DS4246 4U JBOD (24 bays) + LSI controller
- Integration: Install into my quarter rack, controller goes into the R730xd
- Storage Strategy: Pass everything through to Proxmox for one massive ZFS pool
- RAID Philosophy: Since nothing here is irreplaceable, I'm skipping traditional RAID/RAIDZ in favor of individual vdevs
- File Sharing: Still deciding between TrueNAS container vs direct NFS/Samba on PVE host
Step 1: Proxmox 9 Upgrade
Before diving into the hardware, I needed to upgrade to Proxmox 9 for its improved ZFS support. Here's how it went:
Pre-upgrade Checks
# Update current system first
apt update && apt upgrade
# Check current version (needs to be at least 8.4.1)
pveversion
# Run the upgrade checker
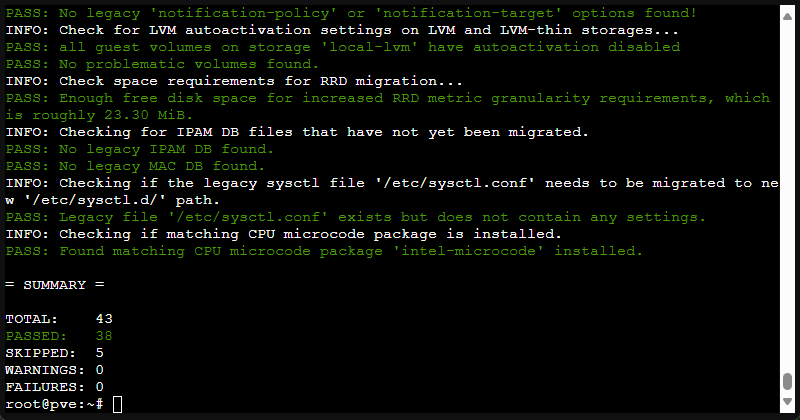
pve8to9 --full
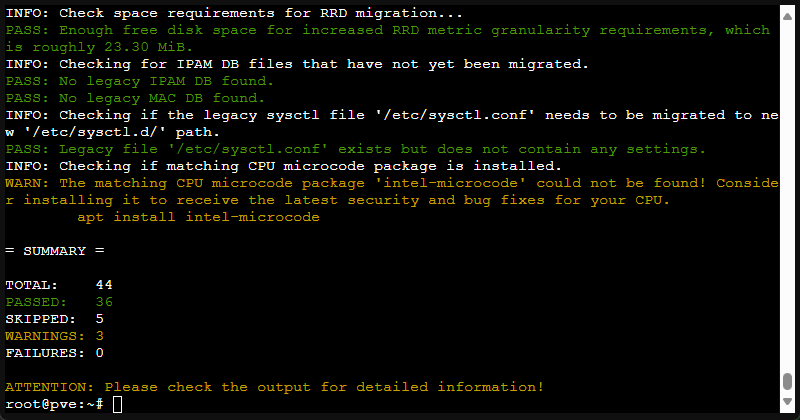
The checker gave me three warnings to address:
- Shut down all VMs (obvious but important)
- Remove systemd-boot (wasn't using it anyway)
- Update CPU microcode (required adding bookworm non-free-firmware source)
After fixing these issues, pve8to9 --full gave me the green light.
Repository Updates
Time to switch from Bookworm to Trixie:
# Update existing sources
sed -i 's/bookworm/trixie/g' /etc/apt/sources.list
sed -i 's/bookworm/trixie/g' /etc/apt/sources.list.d/pve-enterprise.list

# Add PVE 9 repository
cat > /etc/apt/sources.list.d/pve-no-subscription.sources << EOF
Types: deb
URIs: http://download.proxmox.com/debian/pve
Suites: trixie
Components: pve-no-subscription
Signed-By: /usr/share/keyrings/proxmox-archive-keyring.gpg
EOF
The Upgrade Process
# Verify changes
apt update
apt policy

# Clean up old repo
rm /etc/apt/sources.list.d/pve-install-repo.list

# Perform the upgrade
apt dist-upgrade

# Modernize sources post-upgrade
apt modernize-sources
After a reboot, I confirmed the new kernel was running and the web GUI was accessible. Success!
Step 2: Hardware Installation
LSI Controller Integration
I powered down the system to install the LSI controller I got from eBay. Fingers crossed the seller was honest about it being in IT mode...
# Check if the controller is recognized
root@pve:~# lspci | grep -i lsi
03:00.0 RAID bus controller: Broadcom / LSI MegaRAID SAS-3 3008 [Fury] (rev 02)
81:00.0 Serial Attached SCSI controller: Broadcom / LSI SAS2008 PCI-Express Fusion-MPT SAS-2 [Falcon] (rev 03)

# Verify it's the right model and in IT mode
root@pve:~# lspci -vvv -s 81:00.0 | grep -i "subsystem\|revision"
        Subsystem: Broadcom / LSI 9200-8e [LSI SAS 6Gb/s SAS/SATA PCIe x8 External HBA]

# Check driver status
root@pve:~# lspci -k -s 81:00.0
81:00.0 Serial Attached SCSI controller: Broadcom / LSI SAS2008 PCI-Express Fusion-MPT SAS-2 [Falcon] (rev 03)
        Subsystem: Broadcom / LSI 9200-8e [LSI SAS 6Gb/s SAS/SATA PCIe x8 External HBA]
        Kernel driver in use: mpt3sas
        Kernel modules: mpt3sas
Victory! The controller was indeed in IT mode and Proxmox recognized it immediately. Sometimes eBay sellers do deliver on their promises.
JBOD Installation and Connection
After some rack Tetris (why is nothing ever the right size?), I got the NetApp DS4246 installed and connected to the LSI controller via a QSFP to MiniSAS cable.
Step 3: Disk Preparation
The Windows Disk Challenge
The drives I'm testing with came from decommissioned Windows systems, so they had various partition schemes. Initially, Proxmox couldn't see them in the ZFS creation interface.
# Check what disks are being detected
dmesg | grep sd

# Found drives at sdh, sdi, sdj, sdk
# Clean the partition tables
wipefs -a /dev/sdh
wipefs -a /dev/sdi
wipefs -a /dev/sdj
wipefs -a /dev/sdk
After running wipefs on each drive, they appeared in the Proxmox web interface ready for ZFS configuration.
Current Status and Next Steps
I'm now at the point where I need to get creative with storage management. The plan is to:
- Use the 7TB as interim storage while I migrate data
- Break apart the existing 3x 5hdd RAID5 Synology volumes
- Rebuild everything as individual ZFS vdevs
The temporary storage shuffle is always the trickiest part of any major storage migration. Stay tuned for the next installment where I'll cover the actual ZFS pool creation and data migration strategy.
Lessons Learned (So Far)
- Research pays off: The NetApp JBOD was cheaper than repairs and gives me room to grow
- Proxmox 9 upgrade was smooth: The built-in checker caught everything important
- eBay can be trustworthy: Sometimes you do get what's advertised
- Always clean your disks: Windows partition tables will hide drives from ZFS
Hardware Specs
- JBOD: NetApp DS4246 (24-bay, 4U)
- Controller: LSI 9200-8e (IT mode)
- Host: Dell R730xd
- Storage Software: Proxmox 9 with ZFS
This is part 1 of my storage upgrade series. Next up: ZFS pool configuration and the great data migration adventure.